Wednesday 30 April 2008

Doodle Dallion Flower

This is my April tea bag challenge entry on Circle of Crafters. The fold we have to use is Floating Diamonds and Popping Squares by Penny Wessenauer.
I used a design by Tracey Miller called Doodle Dallion Flower for my tea bag tile. The flower stalk is a stamp also designed by Tracey, from a set called Doodles. I inked it with a watercolour marker, and then used my water brush to pull some of the colour from the lines to wash over the leaves. The edges were chalked lightly with green, with hand drawn wavy lines using the same marker as for inking the stamp. Matted onto a pearly lilac Bazzill card, and finished with narrow sheer and satin ribbons, and a Papermania pearl centred brad in the middle of the tea bag.

Monday 28 April 2008

Weekend Sketch Challenge #45

This is my card for Beate's WSC #45. The flower on the card is from an idea I saw at the Glitter Pot - my local craft shop.


The stamp is by Penny Black and is called Dotted Petals. I stamped it in Versamark, onto Scrapbook Walls Fawn Vine patterned paper, and embossed with gold powder. I then stamped it four more times onto a green patterned paper (sorry, can't remember the name of this one) also with Versamark and gold embossing powder. I cut out each of the flower images from the green paper, and one set of leaves. I curved the petals with my embossing tools, and used silicone glue to 3d the petals onto the main image. Two layers were put directly on top of the original petal postions, and two layers were twisted around a little before sticking down. Dotted Gold Stickles glitter glue on the petals and stamens, and finished with a flat backed pearl in the centre. The flower image is matted onto a scrap of gold card, and finished off with green satin and sheer cream ribbon.
The backing card is Green Bazzill Basics - I really must learn to note the colour names of them! I scored two lines with my scoreboard, and embossed just three lines of dots with the Swiss Dots folder above and below the score lines. I embossed a scrap of gold card with the Script folder and slightly distressed the long edges. Ran a thin line of Stickles Gold along the edge of the score lines.

Saturday 26 April 2008

Spots and Dots

This card was going to be for Beate's WSC#45, but I realised just as I was finishing it that it's not quite right for the sketch - so will have to do another one for that. (What a hardship!LOL!)

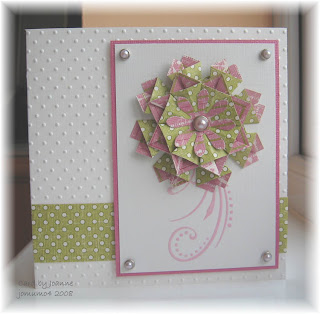
The medallion is made with a fold called Two-for-One by Christian (gizzwizz). I used a Daisy Bucket double sided paper called Wrapped Wishes-Mistletoe Kisses, and then decorated it with a punched flower and Papermania brad. The scroll is from a set by Hero Arts called Fantastic Flourishes. I stamped it with Versamark and embossed with pink powder. Matted onto pink Bazzill with more brads to match the one in the centre of the medallion. I embossed the card front with Swiss Dots, and stuck on a strip of the green polka dotted side of the paper used for the medallion.
I love the way this medallion pops up off the page, and the thicker paper used really adds to that effect.

Friday 25 April 2008

Fanfare Diamond Flower

I made this card for a swap on a tea bag folding group. The fold to be used for the swap was the Fanfare Diamond Fold designed by Carolyninoz. I used a diamond shaped tile design that I made in Photoshop. The green scallops behind the medallion are wedges cut from a Nestability scalloped circle. The backing card was embossed with Swiss Dots top and bottom, and I used my scoreboard to make the embossed lines in the centre. I don't know the name of the scrolled flower stamp - it was inked with Whisper markers to match the colours in the medallion, and repeated along the centre line. Faux stitching between the embossed lines. Matted onto plain blue card, and the edges of both slightly distressed with the blade of my scissors. The little hello tag was cut with oval Nestability dies, and stamped with a stamp from the Stampendous Flower Chat set. Finished with ribbon, and a brad in the centre of the tea bag medallion.

Party Animals

A first birthday card for a nephew, using a Penny Black stamp called Party Animals. Coloured in with Whisper markers. Matted onto a scrap of blue card with faux stitching, and distressed edges. The striped backing paper is by Doodlebug. The happy birthday and the 1 are computer generated using Crazy Girls Blonde font. The circles for the 1 and the white card square are cut with Nestabilities. Finished off with DMC embroidery thread and brads.

Monkeys and Drumsticks

Recently I read on a couple of blogs that while the papers and stamps etc are out for one card, that it is a good idea to make another using those same papers and stamps. (I'm sorry that I can't remember which blogs they were though.) So while everything was out for the 17th card I posted a couple of days ago, I took the advice and made a smaller, simpler card for another male relative. I just used the one stamp, with the same papers, punch and techniques as before. A great time saver all round - especially as coming up with the ideas and how to achieve them is usually what takes the longest for me.

This second card was also made for my son, but for my in-laws to give him. He plays the drums, and is an Iron Maiden fan - hence the font which is a free download here. The backing paper on this card was from a set that came with a magazine, and I chalked brown and grey around the edges for shading. The drumsticks holding up the words are made from Bazzil card with brown and grey chalk to shade. I then scored down the middle of the stick on the back and folded them slightly to give a bit of dimension. They are mounted on the card with foam pads.
I used my drawing program to break apart the two layers of the font, and then exported the shapes to my cutter software so that I could use the machine to cut them out. They were cut out of two different shades of brown Bazzill, and then glued together with pva. The thread that they are hung on is DMC Precious Metal Effects embroidery thread. This was one of those cards that I got to the point where I thought 'why am I doing this?' - and that point came right around tying the threads around the drumsticks! Initially my idea was to have the letters hang freely, but I had to use a tiny snippet of foam pad at the bottom of each one to stop them pinging up all over the place.

Wednesday 23 April 2008

Little Monkeys

Over the last few months, when I have had a teenage boy's card to make, I have asked my teenage son for help with ideas. His stock answer is 'monkeys are always good on cards'. So guess what he has on his birthday card for tomorrow?!

The number 17 filling up the card is taken from a font called Jungle Leaves which is a free download. I used my drawing program to separate the two layers in each number and convert them to a dxf file to take into my Silhouette software to cut out of dark green card stock and the mosaic patterned paper. But they're pretty simple shapes if I'd had to cut them by hand. The edges of the resulting shapes were chalked before gluing together. I glued them flat on the page with pva glue.


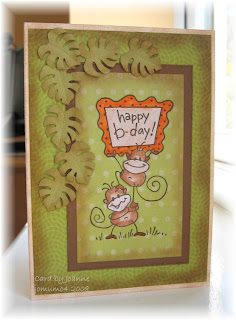
I love the little Stampendous Changuito monkeys, so treated myself to three of those stamps to use on his card. The three I used are: Changuito B'day, Changuito Solo and Changuito Swing. Once I had worked out my arrangement, and chalked the edges of the spotted background paper, I used a stamp positioner to stamp the monkeys directly on the backing paper. The hands and feet were densly coloured enough to cover up the backing paper, but the bodies, faces and happy birthday sign were cut out from additional images stamped onto thin white card and coloured in with water colour pencils and a water brush. Then cut out and glued on with pva.
I used a Woodware Monstera leaf punch to make the leaves. Punched out of light green bazzill basics card, with the edges chalked in brown. Then shaped them with a needle tool.

Tuesday 22 April 2008

No Flowers!

A couple of male birthdays in the family, so no flowers today. I'm quite pleased with how this turned out - it's better than my usual cards for men - although it's not where I thought it was going when I started.

I embossed the background with the Distressed Stripes Cuttlebug folder. I wanted to try out the negative inking technique. So I used Versamark on the brayer to ink up the folder before putting in the green card stock. (It looked pretty good at that stage with the two different shades of green, so I did another one while I was at it to leave like that.) Then I heat embossed using brown powder. The slightly bumpy uneven finish that resulted goes well with the overall look of the card.

The card behind the words is cream with a linen finish. I used green chalk to shade it - also on the card body itself around the edges behind the background. All the edges were distressed.

The letters are computer generated. I used Burnstown Dam font which is a free download. Printed in a very dark brown onto lighter brown card, and then cut out by hand. The font has little dots to indicate nails holding the planks together, so I used some brass dressmakers pins and poked them through each dot. I then used my wire cutters to cut off the pin, leaving a tiny bit sticking out of the back - only about 1-2mm. I put a tiny bit of pva glue on each stump, and then stuck on my foam dimensionals over the stumps and glue. The stumps disappeared into the dimensional, and the pva makes sure that the pin heads stay put.

Finished off with three brads, and some leather cord.

Monday 21 April 2008

Little Rose Flower Tutorial

These flowers are simple to make, and don't take as long as the steps in the tutorial would imply!
It is important to make sure that the pieces are dry before attempting any shaping.

If you do make flowers from this tutorial, I would love to see them - please leave a comment with a link to a picture.

Supplies:
  • Plain white printer paper
  • Green card or paper
  • Punches - leaf, heart, 1/4" circle, stamen
  • Embossing mat (or similar spongy surface)
  • Sponge
  • Markers
  • Tweezers, Needle tool (or darning needle), embossing ball tool
  • Stickles
  • PVA glue


For each flower punch out four hearts, one 1/4" circle, and one stamen from the white paper, and one leaf from the green.


Put a small blob of pva glue on a scrap of paper, and touch the point of the heart to it to transfer a tiny bit of glue. Only a very tiny amount is needed.


Stick the four hearts to the circle as shown.


Sponge colour onto the outer edge of the heart petals. I used colour from my marker, and transfered it onto the sponge by wiping the brush nib repeatedly in a patch on the sponge. Set aside to dry.


Using the markers, colour the stamen shape as shown. Then add a touch of Stickles glitter glue on each rounded end. Set aside to dry.


Place the heart assembly face down on the embossing mat. Using the needle tool held flat on the mat, curl each curve of the heart top by making a sweeping motion from the edge towards the centre - a bit like spreading butter. Press gently into the mat at the same time. If it curls too much then use less pressure, too little then use more. Only do this just on the curved parts of the heart shape - not all the way in to the centre.


Turn the piece face up again, and using the ball embossing tool start at the base of one heart, and make a spiral going in towards the centre. At first use only very gentle pressure, and then get a little firmer as you get into the middle. The more you want the shape to cup, the more pressure you need. If it cups more than you want, then gently spread the petals back down with your fingers.


Use the embossing tool in the same way to cup the stamen shape. Don't use the tool over the ends with the glitter glue.


Put a tiny spot of glue in the centre of the heart assembly, and add the stamens. If you don't have a bottle with a fine applicator, then use a cocktail stick or toothpick to apply a spot.


Place the leaf onto the embossing mat, and use the needle tool to score vein lines. Hold the tool flat against the mat, and press and pull the point from the stem of the leaf towards the tip. Then draw the needle from the centre vein to the edges to create the side veins.


Turn the flower upside down and put a tiny blob of pva in the centre. Place the stem of the leaf in the blob of glue. Leave to dry.


Finished flower. I have added a touch of clear Stickles to the centre of the flower - still wet in the photo!


In the arrangement I made on the challenge card, I added a few extra leaves here and there to fill it out. It is not necessary to stick the leaf to the flower base if you find it more convenient for your arranging.

Sunday 20 April 2008

Weekend Sketch Challenge #44

This is my entry for Beate's Weekend Sketch Challenge #44.

Each flower is made from four small punched heart shapes stuck to a 1/4" circle, with a stamen punch in the centre. The shapes were all punched from white printer paper. The petals were sponged with colour taken from a marker, and then shaped. The stamens were coloured with markers, and then had Stickles glitter glue added to them. The leaves were punched out of the same Bazzill card stock as I used for the background, and then the lines were added with a needle tool. The flowers and leaves were fairly quick to make - but, as usual, the arranging took me ages!

The green background was cut into four, with two pieces stamped with Versamark clear ink and embossed with transparent embossing powder. The other two were run through the Cuttlebug in the Swiss Dots folder. The coral coloured mat layer behind the flowers is white card which was sponged round the edges using the ink from the same marker as that used on the flowers. I really need to get a proper sponge - for this I used a piece cut off of a dishwashing sponge (new one!).

Saturday 19 April 2008

Some Bees, a Bunny and a Mouse


This first card uses a Penny Black stamp called Bees and Bunny. Coloured with Twinkling H2Os. The spotty paper is by Doodlebug, and the green is Bazzill embossed with the Tiny Bubbles Cuttlebug embossing folder. The ovals are cut with Nestability dies. I used a pair of compasses to transfer and enlarge the curve of the plain oval onto the backing paper and card, which I then cut out with scissors. Finished with brads and ribbon.

On the second card I used the Spring Mousey stamp from Great Impressions. Also coloured with Twinkling H2Os, the tulip is 3d'd, but doesn't show well at the angle I took the photo. The circles are nestabilities, and the coloured card is Bazzill. The striped paper was a scrap which I think may be Doodlebug. Finished with knotted ribbon.

Friday 18 April 2008

Nestability Flowers

Here's a little 'how to' on making the flowers that are on this card They are very quick to make. Takes less time to make one than to read the tutorial!

First a list of tools:
  • Scalloped circle Nestability die - one of the smaller ones. Or a scalloped circle punch with an even number of scallops
  • Soft, textured, handmade type paper
  • Scissors
  • Small ball embossing tool
  • Embossing mat or back of a spongy mouse mat or similar
  • Glue - my preference is white pva glue, but adhesive dots would work also
  • Flat backed pearl embellishment, or gem, or brad - whatever you like
  • Marker (forgot to include in the photo)


Cut out the scalloped circle and then fold in half two ways. With the most textured side of the paper uppermost make a dot with the marker in the centre where the two folds cross.


Cut between pairs of scallops towards the dot, stopping about 1/4" away.


Turn the shape over and place on embossing mat. Using a small ball embossing tool make small circular movements whilst exerting gentle pressure next to each scallop to make little indentations as shown. If you don't have an embossing tool, then anything with a small, smooth rounded end will do.


Then emboss in a line between the little indented circles and the base of the petal.


Turn the flower over to the right side again. And with the slightly larger ball end, make circular movements with gentle pressure at the base of the petals. Finish off by pressing down right in the centre.


Apply a very small blob of pva glue on the dot, and add the pearl. Press down firmly on the pearl whilst still on the mat to indent the pearl into the flower. This will be fine if you have not used too much glue!


Finished Flower.

Storing Punches


Michelle has a post here where she shows her punch storage, and asks for photos of other people's storage - so here is mine - I even resisted the urge to tidy it up before I took the photo. It was ok when there was only one layer of punches, but now there are two, and in some places three layers, it is next to useless. Too much time spent rummaging, and not good for the punches either. I know what I would like to do, but haven't found or got around to looking harder for what I want, which is some kind of drawer system with shallow drawers where there would be enough height for one layer of punches. Bearing in mind that I am in the UK . . . . any suggestions?

Thursday 17 April 2008

Hedgehog in the Meadow

Why is it that I've known all year that I needed this card for tomorrow, but I only made it today? Typical of me - wish I could get out of that habit!

I don't have any Prima type flowers - I know shocking! - so having decided that I wanted some on this card, I made my own. I used the smallest size of my classic scallop circle Nestability dies and cut the shapes out of a very textured, soft, handmade style paper. I marked the centre, and then cut in between every other scallop towards the centre, stopping about 1/4 of an inch away. Then I used a smallish ball embossing tool to shape the petals, and finally added a flat backed pearl to finish.


The stamp is by Penny Black - Buzz in the Air! I coloured it with a mixture of Twinkling H2Os and watercolour pencils and markers. I have to combine at the moment, as I don't have many colours of any one type. I gave the hedgehog some grass to sit on using some Art Impressions grass and tiny flowers stamps inked up with watercolour markers. Then washed around them with a waterbrush to blend and fill in the gaps. The happy birthday is a rub-on by Pebbles.

Wednesday 16 April 2008

A Couple of Stamped Cards

Thought I would put up a couple of stamped cards that show some of my first stamping efforts. Am very much a beginner with stamping and have a long way to go with colouring techniques - but having fun with it. I learned a lot when I attended a class (quite a while ago) by Stamping Caz at the Glitter Pot. It was a lot of fun - we had free range of a collection of new spring Penny Blacks, and Caz had picked out a lovely set of bright papers and cards to play with also. I had never done any painting of images before, and spent most of my class trying to absorb and practice that. So much so, that I had to assemble my cards at home. Anyway - here they are-

I have to credit Caz with the design of the cards, as they are ones that she had for us to use at the class.

The stamps are both Penny Black - Lazy Days, and Rainin' Daisies. Both coloured with a combination of Twinkling H2Os and water colour pencils. Any helpful suggestions you may have for me to improve my colouring technique would be appreciated.


Tuesday 15 April 2008

Wedding Flowers


Another card with punched flowers! I made this for a niece's wedding. The wedding colours were pink and ivory, so I used those in my card. The ivory card stock and flowers have shown up white in the photos though. I kept the greeting for the inside mainly because I gave up trying to find a way to put it on the front and still have things look how I wanted. In the end I think I prefer the less cluttered look without a sentiment.


The large flower was made with pink vellum in the same way as the flowers in my 60th anniversary card, except I didn't emboss lines on them. Just curled the petals a little.
The medium ivory and pink flowers are made from punched suns and snowflakes, with little tiny punched flower shapes for the very centre. The spikes of little ivory flowers were made from the same tiny punched flower shapes stuck onto narrow strips of green, with the green centres put in using a green watercolour brush marker. The leaves were all punched out of white paper, and coloured green using my watercolour markers again. All given character by curling and scoring to make veins.
The scalloped oval is a nestability die, and the corner punch is an X-Cut one.

I have no idea whether or not they liked it as they are still on their honeymoon!

Monday 14 April 2008

60th Anniversary Card


My mum asked me to make a card for friends of hers celebrating their 60th Wedding Anniversary. Diamond not being a colour, I was a little stuck for something until my mum said to go with blue. I have been trying out floral punch craft recently, and have been lucky enough to attend a couple of classes given by Jane Gill. She is so talented - and so nice! And a very good teacher. So I used some blue parchment to create some flowers for the card.
The petals are made using a leaf punch, and then a needle tool to create the embossed lines which also cause the petals to curl up. Each flower is made from two layers of 6 petals each, which are stuck to the spokes of a punched out snowflake. The centres of the flowers are made from two layers of a sun shape punched out from white mulberry paper, with little 'diamond' gems in the centres. The leaves were punched from white printer paper and painted green with Twinkling H2Os.
I made the wording using SerifDraw, printed it onto the same cardstock as the main card and cut it out with my nestabilites. I ran a thin line of Diamond Stickles glitter glue around the edge of the circle, and also the edge of the main card, to add a bit more sparkle in keeping with the diamond theme. It does twinkle quite well in real life.
My mum was pleased with the card, but haven't heard yet whether the recipients liked it or not.
Related Posts Plugin for WordPress, Blogger...